How to create a Windows 10 bootable USB on MacOS
You don’t need Unetbootin, MacOS’ Boot Camp, or Rufus for Windows to create a Windows 10 USB bootable drive on a Mac to install Windows on a PC.
I needed to install Windows 10 in a new custom-build PC. I don’t have a single machine running Windows at home, so using Windows to create the bootable installer was out of the question. I tried most of the recommended methods, but after booting from the USB drive and partitioning the disk of the new machine, the Windows installer always complained that it couldn’t find some files it needed for the installation.
Finally, I found the culprit on Stack Exchange. The Windows installer ISO image contains a file named install.wim, which is over 4G bytes long. The USB drive is formatted as FAT32, which cannot hold files over 4G. So, although you’ll find a file named install.wim on the USB drive after creating the installer, the file is corrupted and the installation fails.
The workaround is to compress the install.wim file on your Mac and copy the compressed file, which is around 1GB smaller, to the USB drive. After that, the Windows installer finishes without complain.
Download Windows 10 as an ISO image from Microsoft.
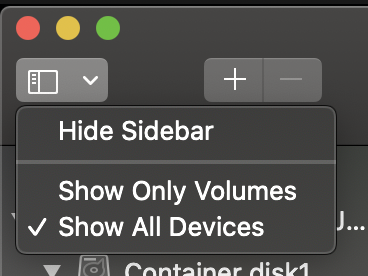
You’ll need an USB drive with at least 5G of space. Using MacOS’s Disk Util, format the USB to ExFAT or FAT (The exact format is not important for the Windows installer, but if your mainboard is not new the mainboard of the computer you are installing to can read the USB drive). Be sure to create boot partition (MBR) while formatting. You’ll need to select ‘Show all devices’ using the upper left button in Disk Util so you can select the whole device for formatting, and not only the available partition.
- Install
wimlibon MacOS using homebrew:
$ brew install wimlib
Double-click on the ISO file to mount it.
Select all files in the now-mounted ISO image and them to the USB drive. Depending on the speed of your USB drive, this may take 20 minutes or more.
In the mounted ISO image, go to the
sourcesdirectory, and copyinstall.wimto a folder on your Mac. (You cannot compress it directly inside the ISO image.)From the terminal, in the folder you just copied
install.wimto, usewimlibto compress the file. Compressing the file will take a long time, probably more than an hour.
$ sudo wimlib-imagex optimize install.wim --solid
- Open the
sourcesdirectory in the USB drive and delete theinstall.wimfile. - Copy your compressed
install.wimfile to thesourcesdirectory on the USB drive. - Unmount the USB drive.
And that’s it! You now have a working Windows 10 installer created on MacOS.
Read more...